Tutorials
- Last updated 22 Aug 22
QUICK START 01 | Operation Basics
QUICK START 02 | Trailblazer Basics
QUICK START 03 | Rails Basics
Now that we’ve learned what operations do and how Trailblazer provides convenient macro steps to ease your life as a software engineer, it’s time to check out how to leverage operations and form objects in Rails.
In this guide you will learn
- where files live and what Trailblazer’s file structure in a Rails application looks like
- how to build basic CRUD operations to implement a blog post lifecycle
- why it’s a good idea to harness
trailblazer-railsgem in your controller
You will not learn
- how to use Cells to replace Rails views with a better abstraction - in this guide will are using vanilla Rails views
- how tests works (this is covered in the next guide)
Where’s the EXAMPLE CODE?
Setup
We are going to create very primitive CRUD operations to create, update, show, and delete a BlogPost model. The operations use simple form objects provided by reform to validate data.
Here’s the Gemfile.
source "https://rubygems.org"

gem "rails", "~> 6.1"
gem "activerecord"
gem "sqlite3"
gem "puma"
gem 'webpacker'

gem "simple_form"
gem "dry-validation"

gem "trailblazer", ">= 2.1.0"
gem "trailblazer-rails"

group :test do
  gem "capybara"

  gem "minitest-line"
end
The trailblazer gem pulls all best-practice gems of the Trailblazer project, like the operation, macros, and reform bindings.
traiblazer-rails adds one single method #run to the ApplicationController which provides a short-cut to invoke operations in controller actions.
For the rendering part, we require simpleform because it makes rendering forms (and erroring forms) super simple! The dry-validation gem integrates with Reform and allows defining validations for our form objects.
File Structure
You can always discover a Trailblazer application in Rails by the app/concepts directory.
app/concepts/
├── blog_post
│   ├── contract
│   │   ├── create.rb
│   │   └── update.rb
│   └── operation
│       ├── create.rb
│       ├── delete.rb
│       ├── index.rb
│       ├── show.rb
│       └── update.rb
Trailblazer files are structured first by concept, then by technology, where the first represents the domain name like “blog post” and the latter an abstraction layer like operation, contract or cell.
Keep in mind that it is also possible to use nested concepts as in app/concepts/admin/ui/post.
In Trailblazer all file and class names are singular which means you don’t have to think about whether or not something should be plural (it is still possible to use plural names, e.g. app/concepts/invoices/..).
Existing controllers, models and other code can peacefully coexist with TRB files - it’s a refactoring framework meant to be used in your seasoned application.
Presentation Operation
We already covered the essential mechanics in chapter 02 and can jump directly into the first problem: how do we render a form to create a blog post?
Since we’re going to use Reform for our forms, we need a presentation operation that creates an empty BlogPost and sets up a Reform object which can then be rendered in a Rails view. The new operation is named BlogPost::Operation::Create::Present and usually sits inline in the Create operation class (and file).
# app/concepts/blog_post/operation/create.rb
module BlogPost::Operation
  class Create < Trailblazer::Operation
    # Only used to setup the form.
    class Present < Trailblazer::Operation
      step Model(BlogPost, :new)
      step Contract::Build(constant: BlogPost::Contract::Create)
    end

    step Subprocess(Present) # Here, we actually run the {Present} operation.
    step Contract::Validate(key: :blog_post)
    step Contract::Persist()
    step :notify!

    def notify!(ctx, model:, **)
      ctx["result.notify"] = Rails.logger.info("New blog post #{model.title}.")
    end
  end
end
The inlined Present operation is a convention to save you from creating another superfluous file. The operation’s sole purpose is to instantiate an empty model and construct a form object for it.
# app/concepts/blog_post/operation/create.rb
module BlogPost::Operation
  class Create < Trailblazer::Operation
    # Only used to setup the form.
    class Present < Trailblazer::Operation
      step Model(BlogPost, :new)
      step Contract::Build(constant: BlogPost::Contract::Create)
    end

    # ...
  end
end
Those are all steps we’ve discussed in chapter 02. Create a new model, and use Contract::Build() to instantiate a Reform form that decorates the model. The form object will be stored in the ctx["contract.default"] variable. API docs
Contract (Dry-validation)
The interesting part in the Present operation is the :constant option: it references the BlogPost::Contract::Create class which defines the form object (or “contract”, we use that interchangeable) for a create context.
# app/concepts/blog_post/contract/create.rb
module BlogPost::Contract
  class Create < Reform::Form
    include Dry

    property :title
    property :body

    validation do
      params do
        required(:title).filled
        required(:body).maybe(min_size?: 9)
      end
    end
  end
end
Including the Dry module activates Dry-validation. In the validation block you can use all mechanics provided by Dry-validation. API docs
While you could be validating your incoming data directly with a Dry-validation contract, using a Reform object, whatsoever, will allow rendering that form in a view.
You are free to chose between ActiveModel validations or Dry-validation in Reform.
Rendering Forms
We now have the form and operation in place and are ready to hook that into the BlogPostsController’s new action.
# app/controllers/blog_posts_controller.rb
class BlogPostsController < ApplicationController
  # ...
  def new
    run BlogPost::Operation::Create::Present do |ctx|

      @form = ctx["contract.default"]
      render
    end
  end
Instead of invoking the operation manually, we use the handy #run method provided by the trailblazer-rails gem. API docs
The run helper yields the block we passed to it, but only in case of a successful operation run. The ctx block argument is the result object from the - successfully - run operation.
This is really nothing more as so.
if ctx = BlogPost::Operation::Create::Present.(params: params)
  @form = ctx["contract.default"]
  render
end
After running the operation, retrieving the contract instance, and storing it in @form it is now time to render a view with a form, that we can actually fill out and publish our blog post.
We will use a vanilla Rails view.
The new view has nothing to do with Trailblazer, it’s pure Rails and hence resides in the good-ol’ app/views directory.
<!-- app/views/blog_posts/new.html.erb -->
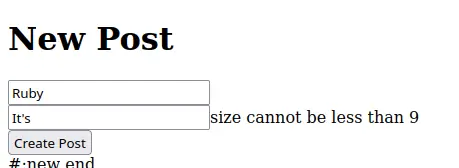
<h1>New Post</h1>
<%= simple_form_for @form, as: :blog_post, url: blog_posts_path do |f| %>
<div class="row">
<%= f.input :title, placeholder: "Title", label: false %>
</div>
<div class="row">
<%= f.input :body, placeholder: "Say it out loud!", label: false %>
</div>
<div class="row">
<%= f.submit "Create Post" %>
</div>
<% end %>
The @form object (which is a Reform instance) is passed into simple_form_for. Note that we do have to provide :url and :as manually since Reform - per default - is not completely compatible to Rails’ magic form helpers. API docs

It looks a bit sad without any layout, but we’ll come to that shortly.
Submitting this very form will POST data to /blog_posts/, which is the next controller action we are going to implement.
Create
And again, we simply run an operation in the controller action. This time it’s BlogPost::Operation::Create.
# app/controllers/blog_posts_controller.rb
def create
  _ctx = run BlogPost::Operation::Create do |ctx|
    return redirect_to blog_posts_path
  end

  @form = _ctx["contract.default"]
  render :new
end
Do you start seeing how controller actions map to operations? This is because in Rails apps, actions correspond to specific application functions (“create blog post”, “search user” or “add a comment”). Since the business logic is encapsulated in operations, you will always find controller actions simply dispatching to a particular operation.
The #run helper executes the block when the operation was run successfully: we are redirected to the index page in case of creating a new blog post.
Please note that there’s a return in the block, causing the controller’s execution to stop. If you forget this, the rest of the create method will be executed, too.
If the operation failed, we re-render the form from new. The #run method also returns the result object from the ran operation, so we can use it outside the block.
Let’s check out the BlogPost::Operation::Create operation in detail.
While the Present operation we implemented earlier only creates an unpersisted model, the BlogPost::Operation::Create operation requires additional logic. It needs to process the submitted form data and physically persists the model in case of validity.
To understand how the operation knows whether or not it was run successful, and how this entire workflow is implemented, we should have a look at its code.
# app/concepts/blog_post/operation/create.rb
module BlogPost::Operation
  class Create < Trailblazer::Operation
    # Only used to setup the form.
    class Present < Trailblazer::Operation
      step Model(BlogPost, :new)
      step Contract::Build(constant: BlogPost::Contract::Create)
    end

    step Subprocess(Present) # Here, we actually run the {Present} operation.
    step Contract::Validate(key: :blog_post)
    step Contract::Persist()
    step :notify!

    def notify!(ctx, model:, **)
      ctx["result.notify"] = Rails.logger.info("New blog post #{model.title}.")
    end
  end
end
Now don’t get confused by the nested Present class in Create! This is only Ruby’s way of namespacing and doesn’t leak any logic or state into the Create operation.
The actual Create class starts after the Present body, with the step Subprocess() statement. This is where we reuse the existing Present operation to create an fresh BlogPost model and form object for it.
The nested Present operation will be run when the Subprocess step is hit.
step Subprocess(Present) # Here, we actually run the {Present} operation.
Without configuration, the nested operation receives the current ctx object. In addition to that, when it finishes running, all its variables are copied back onto the original ctx and hence allowing you to “see” variables like ctx["contract.default"] on the outside. API docs
After building the model and contract is done, we run validations using the Validate() macro, persist the data to the model (in case the validation is happy) and send a notification after it in #notify!.
In this operation we make use of a lot of macros. Those are handy short cuts for frequently used steps such as creating or finding a model, building a contract, validating params using a form object, and so on.
Contract::Validate()uses the form it finds inctx["contract.default"]and runs its validations against theparamshash.Contract::Persist()pushes the validated form data toctx[:model]and callssaveon the latter. API docs
We wrote enough code to have a fully working setup to create, validate and persist blog posts along with post-processing logic such as sending out notifications, which would usually happen in an ActiveRecord callback.
While an invalid form submission will re-render the form with errors. Sane input data causes a redirect to /blog_posts/, aka the index action.
Index
Again, the controller method #index simply dispatches to the BlogPost::Operation::Index operation and then renders a view.
Yes, even data-aggregating functions (that do not alter application state) are embraced in operations.
# app/controllers/blog_posts_controller.rb
def index
  run BlogPost::Operation::Index do |ctx|
    @model = ctx[:model]
    @total = @model.count

    render
  end

end
The collection of BlogPost models is exposed to the controller via ctx[:model]. Using the term :model is a convention and should not mean there’s only exactly one model here.
The total amount of posts is computed in the controller. This is okay to do, but could also be calculated in the Index operation. We are going to refactor this in a later guide.
The collecting Index operation is very straight-forward.
module BlogPost::Operation
  class Index < Trailblazer::Operation
    step :find_all

    def find_all(ctx, **)
      ctx[:model] = ::BlogPost.all.reverse_order
    end
  end
end
The retrieved list is stored in ctx[:model] and exposed to the public under that very key.
This is the place where pagination, filtering, or even delegating to Query objects might happen. You are not limited to basic ActiveRecord usage here. We do offer trailblazer-finder but it’s still under development.
After retrieving the collection of BlogPosts, the controller view index.html.erb is rendered.
# app/views/blog_posts/index.html.erb
<div class="header">
  Total: <%= @total %>
</div>

<%= @model.each do |blog_post| %>
  <h2>
    <%= blog_post.title %>
  </h2>

  <div class="created_at">
    Posted at <%= blog_post.created_at %>
  </div>

  <div class="body">
    <%= blog_post.body %>

  </div>
  <p>
   <%= link_to "Edit", edit_blog_post_path(blog_post.id) %>
  </p>
  <p>
   <%= button_to "Delete", blog_post_path(blog_post.id), method: :delete %>
  </p>

  <hr>
<% end %>
We simply iterate of each row in @model and display the post’s attributes and links to update and delete it.
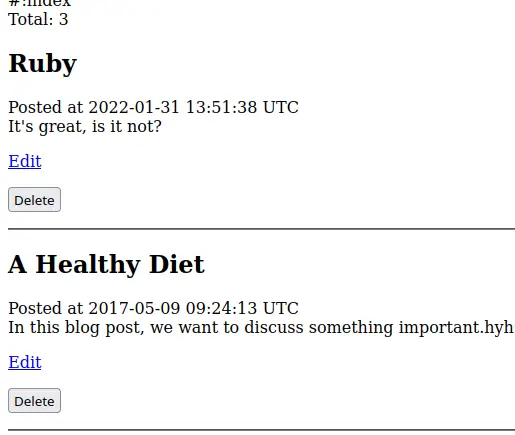
When rendered in the browser, you can see a breathtaking list of posts with buttons and links.
Edit
Clicking “Edit” brings you to the editing form that is rendered by the BlogPostsController#edit action. Keep in mind that the requested URL for this action is something like /blog_posts/edit/1 with an ID in it!
# app/controllers/blog_posts_controller.rb
def edit
  run BlogPost::Operation::Update::Present do |ctx|
    @form   = ctx["contract.default"]
    @title  = "Editing #{ctx[:model].title}"

    render
  end

end
Just like with Create, we use a “present operation” name BlogPost::Operation::Update::Present to prepare the form object, the latter being assigned to @form in the controller.
Note that we also compute a @title for the HTML form in the controller. As this is rendering-specific, it’s totally fine to do so in the controller. Check out, though, how we use ctx[:model] to access the currently edited BlogPost instance and grab its title.
The Update::Present operation has to retrieve the matching model by somehow reading the ID from the URL, and then find the BlogPost row. Here is the operation.
# app/concepts/blog_post/operation/update.rb
module BlogPost::Operation
  class Update < Trailblazer::Operation
    class Present < Trailblazer::Operation
      step Model(BlogPost, :find_by)
      step Contract::Build(constant: BlogPost::Contract::Create)
    end

    # ...
  end
end
Again, the Present operation (that finds the post model) is inlined.
The Model() macro here is configured to use find_by to retrieve a particular model. It does so by looking into params[:id], here’s what Model() does, in pseudo-code.
ctx[:model] = BlogPost.find_by(ctx[:params][:id])
You might be wondering, where is ctx[:params] coming from all at sudden? It is always passed automatically into the operation call when using #run in the controller action. That makes ctx[:params] accessible throughout the operation without being a global. API docs
Since we don’t need differing validations when editing, we reuse the BlogPost::Contract::Create contract we also used earlier. However, and this is one big advantage of this architecture, you could use different contracts for create, update, etc. without any need for ifs as the forms are separate classes and not hard-wired into the model.
The rendered view edit.html.erb is very similar to the create view.
# app/views/blog_posts/edit.html.erb
<h1>Editing "<%= @model.title %>"</h1>

<%= simple_form_for @form, as: :blog_post, url: blog_post_path(@model.id), method: :patch do |f| %>
  <div class="row">
      <%= f.input :title, placeholder: "Title", label: false %>
  </div>
  <div class="row">
      <%= f.input :body, placeholder: "Say it out loud!", label: false %>
  </div>
  <div class="row">
      <%= f.submit "Create Post" %>
  </div>
<% end %>
And as we’re still not using Reform’s ActiveModel magic we have to provide a :url as well as the :method option to SimpleForm in order to submit the form via PATCH /blog_posts/:id.
Submitting the edit form will send us to the #update controller action. Do not forget, this form is sent to /blog_posts/:id - meaning we still do have the post’s ID in params.
Update
Here’s the controller action receiving the edited form.
# app/controllers/blog_posts_controller.rb
def update
  _ctx = run BlogPost::Operation::Update do |ctx|
    flash[:notice] = "#{ctx[:model].title} has been saved"
    return redirect_to blog_post_path(ctx[:model].id)
  end

  @form   = _ctx["contract.default"] # FIXME: redundant to #create!
  @title  = "Editing #{_ctx[:model].title}"

  render :edit
end
When BlogPost::Operation::Update wasn’t happy with the input data, we render the editing form again, just as we did in #edit. There’s quite some redundancy going on here which we could get rid off using the Cells gem, or introducing methods for the controller. Another time.
Nevertheless, if the operation ran successfully, a flash message is set and we’re redirected to the “show” action of the controller.
The work-horse of this use case is obviously the operation with its steps, which you can check out below.
# app/concepts/blog_post/operation/update.rb
module BlogPost::Operation
  class Update < Trailblazer::Operation
    class Present < Trailblazer::Operation
      step Model(BlogPost, :find_by)
      step Contract::Build(constant: BlogPost::Contract::Create)
    end

    step Subprocess(Present)
    step Contract::Validate(key: :blog_post)
    step Contract::Persist()
  end
end
We apply the same Present pattern that we did for Create, and after all, both operations look almost identical, except for the Model() macro usage.
There are means and ways in Trailblazer to reduce this kind of complexity using polymorphism and composition - two things we will discuss in a following guide.
In case of a successful update we’re redirected to the “show” action that is supposed to neatly render one particular blog post.
Show
The #show action in the controller is probably the most boring one so far. The only thing we shall not forget is that we do have the post’s ID stored in params since this action is triggered from a request like GET /blog_posts/1.
# app/controllers/blog_posts_controller.rb
def show
  run BlogPost::Operation::Show do |ctx|
    @model = ctx[:model]
    render
  end
end
The controller logic is pretty much what we already did with Index, which is running BlogPost::Operation::Show, find the model and assign @model, then render the view.
As you might’ve guessed, the operation class is pretty simple, too.
# app/concepts/blog_post/operation/show.rb
module BlogPost::Operation
  class Show < Trailblazer::Operation
    step Model(BlogPost, :find_by)
  end
end
One lonely step uses the Model() macro to retrieve the displayed blog post with .find_by. A colorless, but functional view of a particular blog post is the reward for our hard work.

We’re not gonna win a web design award for that but we’re here to engineer anyway!
The last missing piece for our simple CRUD example is deleting: we want to be able to trash articles that no longer fit.
Delete
You can do so by clicking the “Delete” link in the show view, which is sending us to the controller action #destroy. The triggered request here is DELETE /blog_posts/1, which implies we got the ID in params.
# app/controllers/blog_posts_controller.rb
def destroy
  run BlogPost::Operation::Delete

  flash[:notice] = "Post deleted"
  redirect_to blog_posts_path
end
In this action, we neither have to handle the case that “something went wrong” nor do we need the deleted model for the rendering layer. We don’t have to use run with a block! After deletion, we get redirected to the index view.
The operation has two simple steps.
# app/concepts/blog_post/operation/delete.rb
module BlogPost::Operation
  class Delete < Trailblazer::Operation
    step Model(BlogPost, :find_by)
    step :delete

    def delete(ctx, model:, **)
      model.destroy
    end
  end
end
The Model macro helps finding the blog post instance, and a custom delete step actually deletes the model using ActiveRecord’s #destroy method. Your ingenuis work is lost and gone forever.
Summary
Building a simple CRUD component with Trailblazer might feel a bit strange and over-engineered at first sight. Operations, steps, macros and form objects are something very different to what the Rails Way™ promised. Trust us, though, the steep but short learning curve is worth the way. Teams of any size relying on the Trailblazer architecture continuously report about their benefits of consistency, extendability and structure.
Nevertheless, we haven’t written a single line of tests. There is no excuse for that, given that Trailblazer’s test style is much easier to understand than Rails’ fragmented testing world. Check out the [testing QUICK START] to make your app bullet-proof.
Railway Basics
Every modern application is composed of many different domain processes that need to be modeled, implemented, and maintained. Whether this is the life-cycle of a <user> entity or just a sign-up function, it has to be defined and coded somewhere.
Trailblazer strikes when it comes to organizing business code.
If you’re interested in learning how to organize code, where to use Trailblazer’s activities and how to model basic workflows using the Railway pattern, this tutorial is for you.
Already know how step, pass and fail work? Keyword arguments from ctx and #wtf? bore you? Jump right to [the next chapter]!
Activities
Trailblazer is an architectural pattern that comes with Ruby libraries to implement that pattern. While there are many interesting layers such as Cells for the view, or Reform for validations and forms, the Activity component is the heart of TRB.
An activity is a high-level concept to structure code flow and provide interfaces so you don’t have to think about them. Instead of one big code pile, activities will gently enforce a clean, standardized way for organizing code.
Activities are a necessary abstraction on top of Ruby. They help streamlining the control flow, and take away control code while providing you with an incredibly cool developer experience.
You’re allowed to blame us for a terrible developer experience in Trailblazer 2.0. It’s been quite painful to find out which step caused an exception. However, don’t look back in anger! We’ve spent a lot of time on working out a beautiful way for both tracing and debugging Trailblazer activities in 2.1.
Activities can be used for any kind of logic and any level of complexity. Originally designed to “only” implement railways for CRUD logic, we now use activities in many parts of Trailblazer itself, from DSL options processing code, for pluggable, nested components of our applications, up to long-running processes, such as a user’s life-cycle, that is comprised of a dozen or more nested activities.
An Oauth Signup
In this tutorial, we implement a sign-up function for a Ruby application. The first version only allows signups (and signing-in existing users) via Github Oauth. Don’t worry, we are not going to discuss the bits ‘n bytes of Oauth.
It’s a scenario directly taken from the Trailblazer PRO application which allows us to discuss a bunch of important concepts in Trailblazer.
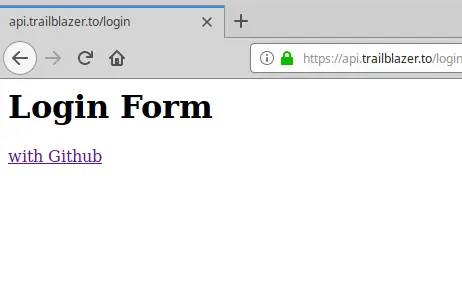
When clicking the Github link, the beautiful [omniauth gem] performs its magic. It handles all Oauth details and will - in case of a successful authorization via Github - send a hash of login data shared by Github to a pre-configured controller actions of our app.
All we need to do now is receive the data sent from Github, decide whether this is a new user and save their data, or an existing user, and then sign them into our application.
At this stage, routing, controllers, etc is irrelevant. Just imagine a Rails controller action, a Sinatra router or a Hanami action as follows.
def auth
  # at this stage, we're already authenticated, it's a valid Github user!
  result = Signup.call(params: params)
end
The Trailblazer architectural style encapsulates all business logic for one function in one operation*. In other words: the controllers usually contain only routing and rendering code and dispatch instantly to a particular operation/activity class.
*An Operation is always an activity.
Whatever data from the outside is needed in the activity has to be passed explicitely into the activity’s call method.
In our case, the sign-up is handled in the Signup activity. We pass the params hash into it, which roughly looks like this.
{
 :provider=>"github",
 :info=>{
  :nickname=>"apotonick",
  :email=>"apotonick@gmail.com",
  :name=>"Nick Sutterer"
 }
}
So, let’s review: Omniauth handles Oauth authorization for us. Regardless of the implementation, this is usually automagic for the developer. The gist of it is: Omniauth sends a hash of data to our auth controller action once it’s done. Now, it’s the Signup-activity’s duty to process that data. We’re going to implement just that now. Are you ready?
A Railway activity
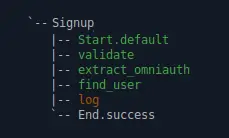
In the first throw of this requirement, we need to parse the omniauth hash, make sure it’s in a format we understand, find out what user is signing in, log that successful sign-in somewhere, and finally communicate to the outer world that the signin was successful.
We do ignore new sign-ups at this stage and only allow existing users to sign in.
A diagram resembling this chain of tasks would look like the following fragment of a BPMN diagram.
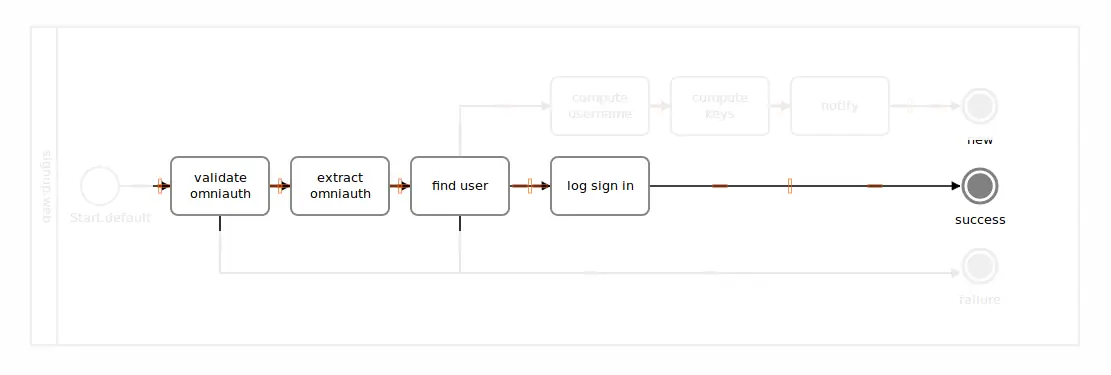
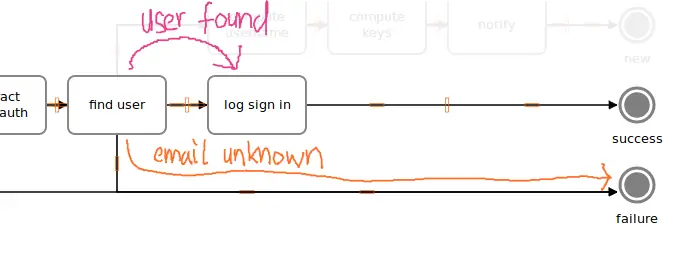
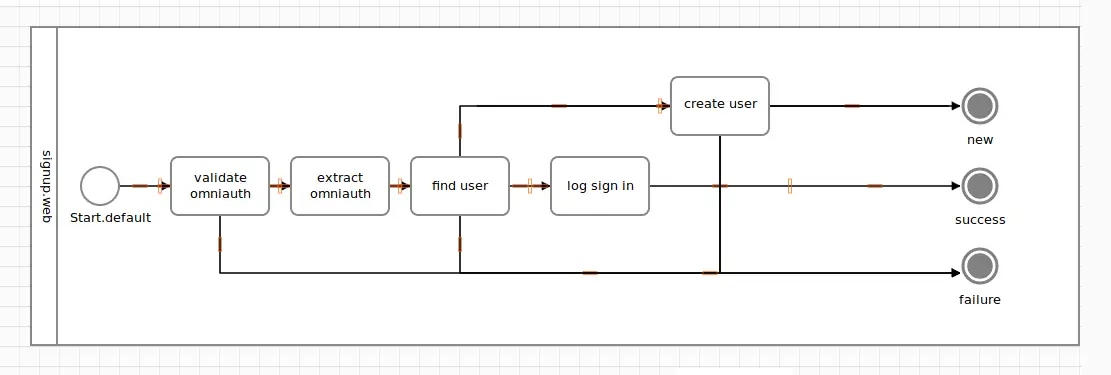
Now let’s drop our optimism for a second, and face cold reality. Things could go wrong in two places here. First, the validation could fail if Github sends us data we don’t understand. Second, we might not know the user signing in, meaning the “find user” logic has to error-out, leading us to a diagram like this.
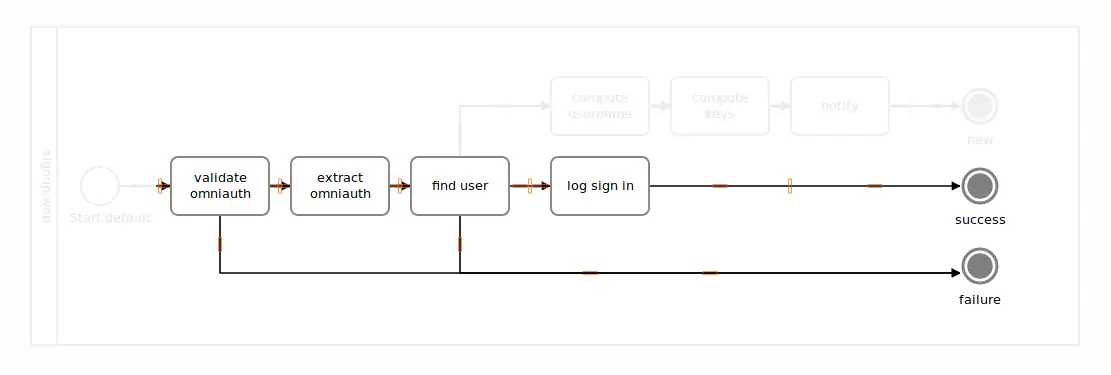
If anything here did fail in “validate omniauth”, all other steps in the chain would be skipped as the flow would follow the path leading to the failure terminus.
Assuming the validation was successful, if the user provided by Github wasn’t found in our system (in the “find user” box), the remaining logging step would be skipped, ending up in that mysterious failure circle, again.
Intuitively, you understand the flow just by looking at the BPMN diagram. And, heck, we haven’t even discussed BPMN or any terminology, yet!
Modelling the flow of a program where chunks of code are executed in a certain order, with a successful “happy path” and an “error-out” path is called a Railway. It popped up in functional languages [a long time ago].
Terminology
Before we continue, let us quickly clarify some lingo when working with Trailblazer, BPMN, and activities.
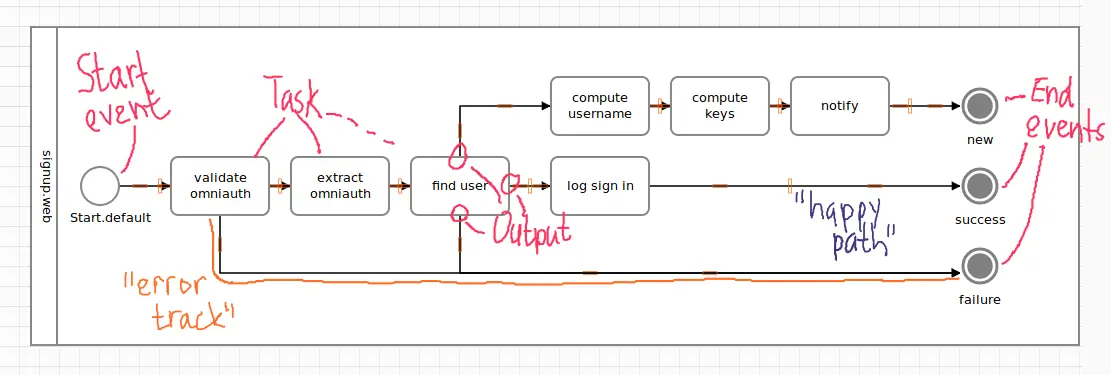
Be honest, you’re loving my handwriting already, aren’t you?
- The start event is where the flow starts. It’s a simple circle.
- Every path or flow stops in a terminus event. Those are the filled circles. Often, we call them end event, too!
- Your actual logic happens in tasks, the labeled boxes. A task may be any callable Ruby object, an instance method or even another activity.
- Every task has at least one output which identifies an outgoing connection to the next element. An output in Trailblazer keeps a semantic and is triggered by exactly one signal from its task. A task is often called step.
- The “happy path” or “success track” is the straight path from start to the terminus named
success. - The “error path” or “failure track” is the lower path going the the
failureterminus.
Implementation
Our present job is to implement those four consecutively invoked steps.
While you could program this little piece of logic and flow yourself using a bunch of Ruby methods along with a considerable amount of ifs and elses, and maybe elsif, if you’re feeling fancy, a Trailblazer activity provides you a simple API for creating such flow without having to write and maintain any control code. It is an abstraction.
class Signup < Trailblazer::Activity::Railway
  step :validate
  pass :extract_omniauth
  step :find_user
  pass :log
end
Six lines of code create an executable object that, when invoked, will run your code in the order as visible in our diagram, plus the ability to “error out” when something goes wrong.
We’ll get to explaining what such a step looks like, or how its code chunk can “go wrong”. Relax.
Please do note that we’re using two different DSL methods: The #step method will allow “erroring out”, its friend #pass enforces successful outcomes, only. More on that later.
In order to invoke, or run, this activity we just created, there is one recommended public way: its invoke method. You might remember that from the controller example above.
ctx = {params: {provider: "Nickhub"}}

signal, (ctx, _) = Signup.invoke([ctx], {})
Ignore the clumsy-looking invoke API here for a minute. This is what sets off the execution of the activity. From start to end all boxes on the taken path are executed. Each step receives the return value of its predecessor. The return value decides about what next step is called.
Your excitement when running this code the first time will be smashed to pieces in an instant with the following exception.
NameError: undefined method `validate' for class `Signup'
Obviously, the implementation of the actual tasks is still due. It’s a good time to do that now.
Technically, a task in an activity can be any callable Ruby object. There are [numerous ways to define tasks]. What we will be using at this stage of the tutorial is the :instance_method-style. This means you define instance methods in the activity class and pass their :method_names to the DSL step method.
Let’s go through each method step by step (no pun intended!). Here’s #validate implemented in pure Ruby.
class Signup < Trailblazer::Activity::Railway
  step :validate
  pass :extract_omniauth
  step :find_user
  pass :log

  # Validate the incoming Github data.
  # Yes, we could and should use Reform or Dry-validation here.
  def validate(ctx, params:, **)
    is_valid = params.is_a?(Hash) && params["info"].is_a?(Hash) && params["info"]["email"]

    is_valid # return value matters!
  end

  # ...
end
Task methods always expose the so called [task interface] (unless configured otherwise), meaning both its arguments as well as the return value do matter!
Now, have a look at #validate. The first argument is the ctx data structure. This is whatever you passed into the activity invocation. Use the ctx object to access string keys and to write state to.
def validate(ctx, params:, **)
  raise params.inspect
end
Every symbol key in ctx is automatically available as a keyword argument, such as params: above. Using a hard-core raise you can quickly find out what’s this about.
To hit the raise, invoke the activity.
ctx = {params: {provider: "Nickhub"}}

signal, (ctx, _) = Signup.invoke([ctx], {})

#=> RuntimeError: {:provider=>"Nickhub"}
As an avid engineer, you instantly realize the params: keyword argument in #validate represents whatever was passed under that key in the ctx object. So simple!
Keyword arguments are very encouraged in Trailblazer as they’re elegant and have a bunch of beautiful features.
Keyword arguments allow to define particular parameters as required. Should the parameter be missing, they also provide a way to set a default value. This is all done with pure Ruby.
Always remember that you don’t have to use keyword arguments - you could simply go the longer, less elegant way through ctx.
def validate(ctx, **)
  params = ctx[:params] # no keyword argument used!
  raise params.inspect
end
The outcome is identical to the above.
Now that we understand what goes into a task, let’s learn about what goes out.
When using the task interface, the return value of a method is important!
def validate(ctx, params:, **)
  is_valid = params.is_a?(Hash) && params["info"].is_a?(Hash) && params["info"]["email"]

  is_valid # return value matters!
end
In #validate, our highly sophisticated validation will return either true or false, causing the activity to proceed to the next step, or “error out”.
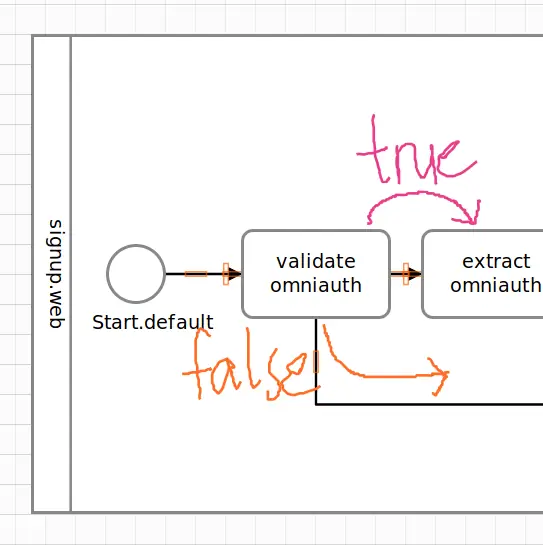
In other words: different return values will trigger different outputs of the task. The flow will continue on the outgoing connection of the output.
Two things.
- Yes, we are going to use a real validation library later, Reform or Dry-validation, or both.
- And, yes, you may return other signals from a task and thus have more than two outgoing connections. We’ll elaborate on that [in part II]!
We still haven’t put all pieces into place in the activity. Some task methods are missing.
Pass
May I bring your attention to the second step extract_omniauth? In this step, we extract relevant data from the Oauth data structure for further processing.
class Signup < Trailblazer::Activity::Railway
  step :validate
  pass :extract_omniauth
  step :find_user
  pass :log

  # ...
end
Since the structure from Github is already validated, we can safely assume there’s no “erroring out” necessary here. The pass DSL method does ignore the actual return value and will always return true.
def extract_omniauth(ctx, params:, **)
  ctx[:email] = params["info"]["email"]
end
Given Omniauth & Github are providing a proper data structure, we now have the email of the signing-in user directly on the ctx object - simply by writing to it. You can use this new value email: in following methods as a keyword argument!
A key/value pair written to ctx, e.g. by doing ctx[:email] = "yogi@trb.to" is sometimes called a variable. So, when we’re talking about a variable, it’s refering to either a key and its value in ctx, or to a keyword argument (which is one and the same).
Again, when using a task method with pass, the returned value of your logic is irrelevant, it will always stay on the “happy path”.
Active Record? Logging?
Still some work to do! After validating and extracting the email address from the structure provided by Github, we can finally check if this user is already existing in our system, or needs to be added. The #find_user method is our next step.
def find_user(ctx, email:, **)
  user = User.find_by(email: email)

  ctx[:user] = user
end
In this code chunk we use ActiveRecord* and its #find_by method to either retrieve an existing user model, or nil. Check out how we can use the variable email as a keyword argument, being computed and provided by (one of) the previous step(s).
As this step is added to the activity via step, the return value is crucial!
*The fact we’re using ActiveRecord (or something looking like it) doesn’t mean Trailblazer only works with Rails! Most people are familiar with its API, so we chose to use “ActiveRecord” in this tutorial.
The activity - at this stage - deviates to the error track when there’s no user and skips all remaining logic. This is, of course, because the last statement in #find_user will evaluate to nil in case of a new signup, as this email address is yet unknown. A falsey return value means “error track”.
To finish up the activity v1, we add an empty logging step. You probably already got the hang of it, anyway.
def log(ctx, **)
  # run some logging here
end
Our Signup activity is now ready to be executed, even though it doesn’t cover all business requirements, yet, and is unfinished.
Invocation, for real!
First, let’s learn about a failing case where Github sends us data of a user we don’t have in our system, yet.
The following snippet shows you a realistic data structure coming from Github (given that I’m logged-in there, which… I currently am). The last line shows how the initial ctx is created.
data_from_github = {
 "provider"=>"github",
 "info"=>{
  "nickname"=>"apotonick",
  "email"=>"apotonick@gmail.com",
  "name"=>"Nick Sutterer"
 }
}

ctx = {params: data_from_github}
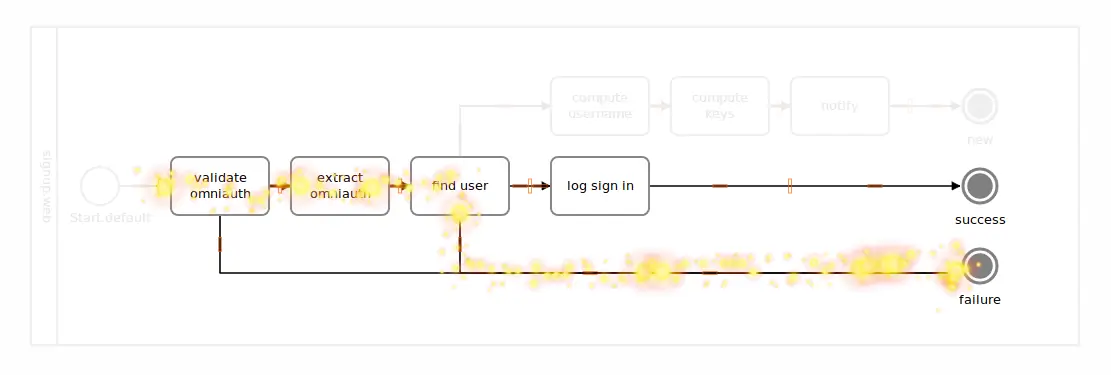
Our “database” is initialized to contain no users, which should make the activity end up on the failure terminus.
User.init! # Empty users table.

signal, (ctx, _) = Signup.invoke([ctx], {})

puts signal     #=> #<Trailblazer::Activity::End semantic=:failure>
puts ctx[:user] #=> nil
Admittedly, both the signature and the return values of invoke feel a bit clumsy. That’s becaus we’re currently working with the low-level interfaces.
The returned signal is the last element in the activity that’s being executed. Visually, it’s usually represented by a circle. In our railway example, that would be either the success or the failure terminus event.
Inspecting the signal, it looks as if we hit the failure terminus. Furthermore, peeking into ctx, the :user variable is unset, hinting that the path we took is the one visualized here.
To have a successful sign-up, the user must be present in our database. Here’s the invocation with the user already exising.
User.init!(User.new("apotonick@gmail.com"))

signal, (ctx, _) = Signup.invoke([ctx], {})

puts signal     #=> #<Trailblazer::Activity::End semantic=:success>
puts ctx[:user] #=> #<User email: "apotonick@gmail.com">
This time, the signal looks like we’re winning. Also, the user is set from the #find_user step, suggesting the following flow.
The provided data from Github is sane, the user is found by their email, and we’re set to sign them in with a cookie (yet to be done).
Error handling
For completeness, let’s quickly discuss how to place tasks on the error track. #fail allows you to add error handlers.
class Signup < Trailblazer::Activity::Railway
  step :validate
  pass :extract_omniauth
  fail :save_validation_data
  step :find_user
  pass :log
  # ...

  def save_validation_data(ctx, params:, **)
    Logger.info "Signup: params was #{params.inspect}"
  end
end
As visible in the diagram, #fail puts the error handler on the error track, while maintaining the linear order of the flow: it sits after extract_omniauth, but before find_user.
Per default, the return value from a fail task is irrelevant, it will always stay on the error track. In part II we will cover how to jump back to the happy path.
It’s also important to understand that save_validation_data will only be invoked for an error from validate (and if extract_omniauth were attached using step). In other words, find_user and followers do not have an error handler.
We are going to revert this fail feature for the time being. In the next tutorial about nesting and the wiring API, we will meet this handler, again.
Terminus signals
When invoking activities, you will want to find out where it stopped and what end has been hit, so you can decide what to do. For example, a Rails controller could either redirect to the dashboard page, in case of a successful sign-in, or render an error page.
There are two ways to learn that a terminus has been reached. You could simply inspect its semantic.
signal.to_h[:semantic] #=> :success
Every element in TRB provides a #to_h method to decompose it. Terminus events will have a field :semantic, and in a standard railway activity, they’re either :success or :failure.
Alternatively, you can check the signal’s identity against the terminus that you’re expecting, for instance by using the Introspection API.
Trailblazer::Activity::Introspect::Graph(Signup).find("End.success")[:task] == signal
The return signal is simply the object or task that was executed last. In railways, the automatic IDs for end events are End.success and End.failure, that why you can [retrieve those object using Graph#find].
Exposing data
You probably already got the idea from previous example code: the only way to expose data to the outer world (whoever invoked the activity) is by reading from the ctx object. In other words, if any data from within the activity is needed, say, for rendering an HTML page or taking a routing decision in a controller, it has to be written to ctx at some point during execution of the activity.
ctx[:user] #=> #<struct User email=\"apotonick@gmail.com\">
There are [mechanics to filter what goes in and out], but keep in mind that Trailblazer forces you, in a gentle, tender way, to explicitly define what you want the caller to know, by writing it to ctx.
WTF?
Now that we’ve discussed all basic concepts of activities, let’s check out some of the tooling around Trailblazer.
A huge advantage over messy Rails code is that Trailblazer’s Activity hides logic, flow and variables from the caller. The entire sign-up works by invoking the black box activity in the controller.
While developers appreciate the encapsulation, they used to hate the debugging: finding out what path the execution took. We “recently” added tracing to do just that (it only took three years).
This is my absolute favorite feature ever and the official reason for (re-)writing Trailblazer 2.1. It makes me happy every time I use it.
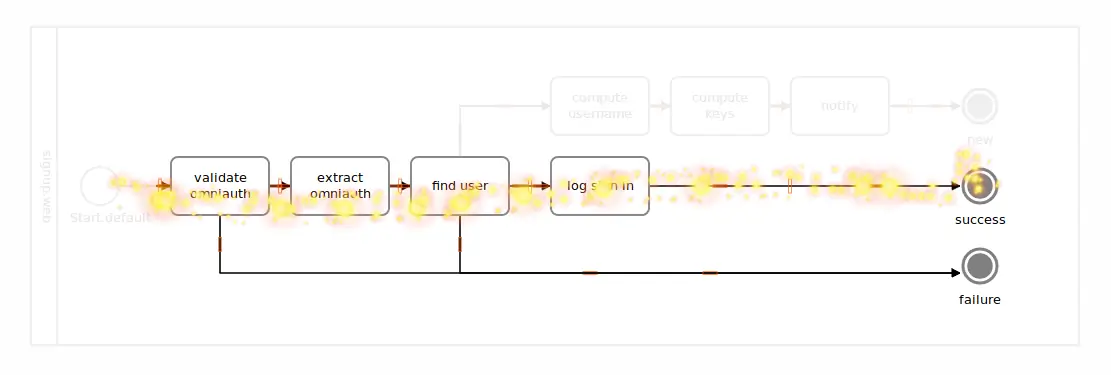
Simply use #wtf? to invoke your operation.
signal, (ctx, _) = Trailblazer::Developer.wtf?(Signup, ctx)
The signature and return values are identical to #invoke. However, now, tracing is turned on, and will output the flow to the terminal.
No more guessing anymore, you can follow the path and even in deeply nested activity structures you won’t get lost anymore.
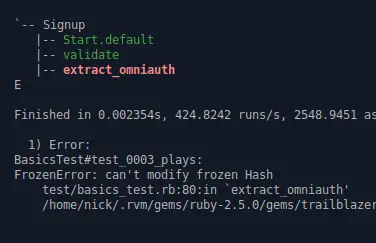
What sounds like a cheesy commercial slogan is actually about to become your best friend. Check out how #wtf? also allows to find out where things broke, in case of an exception.
By making the ctx object frozen, it will throw an exception whenever we write to ctx using ctx[:something] = ..., which should be the case in #extract_omniauth the first time.
ctx = {params: data_from_github}.freeze #=> no setter anymore!

signal, (ctx, _) = Trailblazer::Developer.wtf?(Signup, ctx)
As promised, #wtf? catches that and shows you the closest task in red.
With Ruby only knowing methods and files and stack-traces from hell, Trailblazer is years ahead when it comes to debugging. Having an understanding of higher level abstractions, such as tasks, activities and the historical code path taken, its debugging trace is much closer to how you, as an engineer, think about your code.
This feature has saved me hours of debugging, before it was even released.
Next!
In the next tutorial we will focus on the Wiring API and learn how to create more complex activities. The sign-up code to enter a new user into our database needs to be written. To help you reduce complexity, we will learn about nesting activities, too.
Wiring API
In our current version as written in the previous tutorial, we can process an Oauth signup via Github and handle existing users who have signed up before. Those who haven’t cause our Signup activity to “error-out”. It will end in the failure terminus.
It’s now time to implement signing-up new users! Instead of introducing a new “track” to handle this case, I’d like to play around with some important concepts of the wiring API.
Output
Why don’t we put the “create user” task onto the failure track, and in case of successfully persisting the new user, we deviate back to the happy path? This is totally possible with Trailblazer.
Here’s a diagram of the flow we’re about to implement.
Placing a step on the error track is something we discussed before. However, deviating back to the happy path is new.
class Signup < Trailblazer::Activity::Railway
  step :validate
  pass :extract_omniauth
  step :find_user
  fail :create_user, Output(:success) => Id(:log)
  pass :log

  def create_user(ctx, email:, **)
    ctx[:user] = User.create(email: email)
  end
  # ...
end
In line 5, where you see fail :create_user, we can see something new and unsettling.
Remember, in a railway activity each task has two standard outputs with the “semantics” success and failure. When returning a trusy value, the task will trigger the output marked with the success semantic, and likewise for failure.
By using Output(:semantic), you can select an existing output of the task and rewire it.
Id
To actually connect the selected output to a specific target, you can use Id() and provide the ID as the only argument.
Output(:success) => Id(:log)
Since IDs are assigned automatically (unless you’re [using :id]), this is very simple and intuitive.
Reconnecting the success output results in a customized flow as visible in the diagram above. We can reassure it works by invoking the activity using wtf?.
User.init!()

ctx = {params: data_from_github}

signal, (ctx, _) = Trailblazer::Developer.wtf?(Signup, [ctx])
Since the user database is empty, we’re taking the new path via #create_user and then back to the happy path to #log.
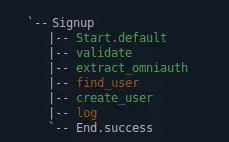
The flow is deviated back after #create_user if we return a trusy value - exactly what we wanted!
Track
Instead of connecting an output to a particular task, you can also choose to let it connect to a track. A track is created by taking a task’s output, retrieving its semantic, and then connecting it to the next available task that is “magnetic to” this semantic. Repeating this process automatically, the activity’s DSL creates “tracks” for you. We will talk about this a bit later.
class Signup < Trailblazer::Activity::Railway
  step :validate
  pass :extract_omniauth
  step :find_user
  fail :create_user, Output(:success) => Track(:success)
  pass :log

  # ...
end
When using Track(:semantic) the output will “snap to” the closest, following task that is “magnetic to” it, resulting in an identical circuit or flow as above.
Render the circuit
When reconnecting outputs you might feel the urge to see what monster you’ve just created. Especially when the flow doesn’t flow as you want it to, rendering the circuit of the activity is crucial.
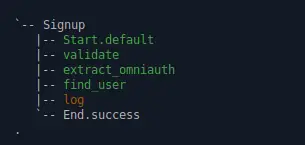
Use Developer.render to visualize the activity’s circuit.
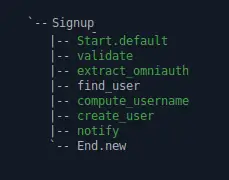
puts Trailblazer::Developer.render(Signup)
Thanks to puts, there will be an ugly but sufficient rendering of your activity in the terminal.
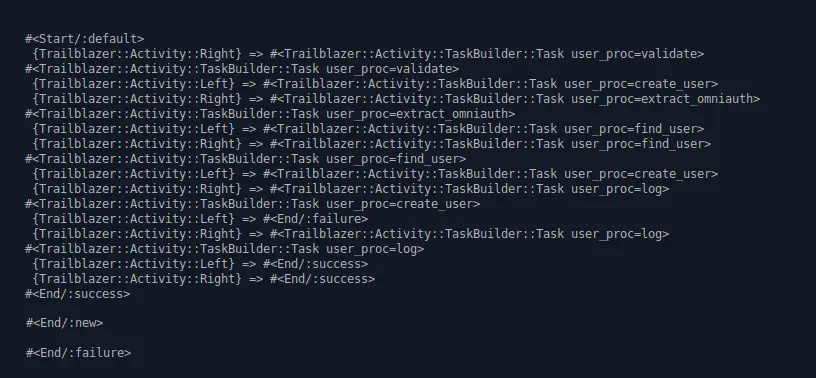
It lists each task and its outgoing connections. You can see the signal and its target task, the output semantics are not shown.
Having a closer look, you will see that putting “create user” on the failure track probably isn’t such a great idea, as it will also get invoked when #validate errors-out.
It’s a good idea to introduce a new, separate path for handling new users.
Adding outputs
When “trailblazing” a new, unbeaten track in your activity you have two options: manually inserting new steps and connecting them forming a new path, or using a macro. We will discuss the manual technique first.
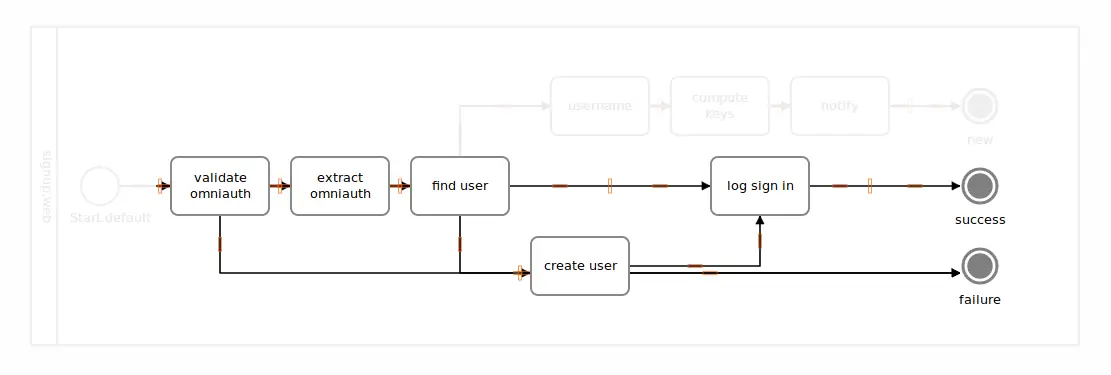
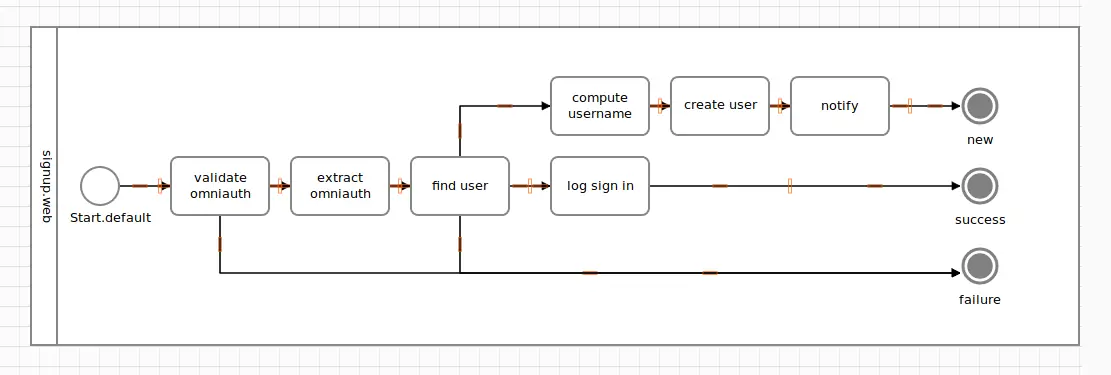
Looking at the new diagram, you understand that our goal is to branch out from #find_user, then execute one or more tasks on the new path, and finally end in a new terminus called new.
Our activity has slightly changed to introduce the new “track”.
class Signup < Trailblazer::Activity::Railway
  NewUser = Class.new(Trailblazer::Activity::Signal)

  step :validate
  pass :extract_omniauth
  step :find_user, Output(NewUser, :new) => Track(:create)
  step :create_user, Output(:success) => End(:new), magnetic_to: :create
  pass :log

  # ...
end
To add a new output to the #find_user task, we can use Output() with two arguments!
- The first argument (
NewUser) is the signal that#find_userreturns in order to trigger that very output. This must be a subclass ofTrailblazer::Activity::Signal. - The second is the semantic of this new output. Semantics are mostly relevant for nesting, which we will discuss later.
Please note that find_user now has three outputs.
The new output will snap to a track called :create, which is discussed in the next section.
Returning signals
Below is the new task method #find_user. Keep in mind the we got three outputs here, so we somehow need to communicate to the activity which output to take.
def find_user(ctx, email:, **)
  user = User.find_by(email: email)

  ctx[:user] = user

  user ? true : NewUser
end
Per default, having just two outgoing connections in a railway, that’s easy: a trusy value and a falsey value returned are enough to command which path to take.
However, now we got three outputs, so we need a third “signal”. That’s exactly why we introduced NewUser (it could have any name), and since it’s configured to trigger the :new output, your activity now has a third path to travel, should find_user return this signal.
Magnetic_to
To understand how tracks work, we need to understand the :magnetic_to option.
step :find_user, Output(NewUser, :new) => Track(:create)
step :create_user, Output(:success) => End(:new), magnetic_to: :create
We already discussed “polarizing” an outgoing connection using Track(). For example, an output using Track(:create) will snap to the next possible task that is “magnetic to” :create. That’s how tracks or paths are created. Nothing more!
This is exactly what we do with create_user: it’s got magnetic_to: :create, which won’t put it on the “happy path” (:success) but a new path.
Have another look at the new diagram above. While create_user sits on a newly branched out path, its failure output still goes to the error track automatically. You could change that by redirecting it with Output(:failure).
Adding a terminus
It is up to the activity modeler what to do next. In our case, from create_user we head straight into an additional terminus, or end event as it’s called in BPMN.
You can add an additional terminus to an activity [using End()].
When using End(:semantic) multiple times with the same semantic, they will all refer to the identical terminus.
Using multiple termini has three magnificent, beautiful advantages.
- You may communicate more than a binary outcome of an activity. For instance, a controller endpoint activity could have end events for success and failure, but also for “not authorized”, or “validation failed”. You’re not limited to a binary setup here.
- It is much easier to track what is going on within the activity. Instead of transporting additional state via
ctx, you expose the outcome via an additional end event. - When nesting an activity with multiple outcomes, you can wire each terminus to a different route. We will discuss that in a following section.
Our activity has three outcomes now: something went wrong (obviously the failure end event), we got an existing user signing-in (success terminus) or a new potential payee signed-up, ending in the new terminus.
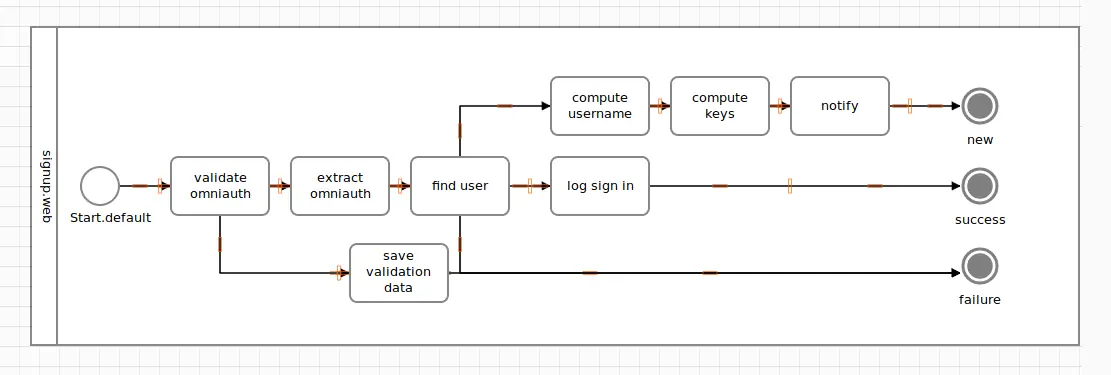
Path
After installing that third “path”, let’s assume we wanted more than one step on it. The final Signup activity that you’ve all been waiting for has three steps to perform when a new sign-up occurs.
While we could achieve this using Track() and the :magnetic_to option, there’s a handy macro for branching out a custom track: Path().
class Signup < Trailblazer::Activity::Railway
  NewUser = Class.new(Trailblazer::Activity::Signal)

  step :validate
  pass :extract_omniauth
  step :find_user, Output(NewUser, :new) => Path(end_id: "End.new", end_task: End(:new)) do
    step :compute_username
    step :create_user
    step :notify
  end
  pass :log

  # ...
end
While it’s obvious that all step tasks placed into the block will be neatly arranged on the new path, the options for Path() need some explanation. The :end_id is important since it sets the terminus’ ID, and that very terminus is created using :end_task. This will lead the path straight into the terminus.
Check [Path()’s docs] for a list of all options. You don’t have to terminate in an end event, you can reconnect the path to other elements.
For completeness, here’s the code of the three added tasks.
def compute_username(ctx, email:, **)
  ctx[:username] = email.split("@")[0]
end

def create_user(ctx, email:, username:, **)
  ctx[:user] = User.create(email: email, username: username)
end

def notify(ctx, **)
  true
end
Again, we’re not implementing a sophisticated notification framework or an advanced username generator here, but merely focus on structural mechanics of Trailblazer.
Do note, though, that Path() only connects the :success outputs of its tasks. Put differently, this means if #compute_username would fail, things will break.
Path escape
Why not mock an error in #compute_username, even though our validation should protect us from that.
def compute_username(ctx, email:, **)
  false
end
When invoking the Signup activity now, it will break with the following exception.
Trailblazer::Activity::Circuit::IllegalSignalError: <>[][ Trailblazer::Activity::Left ]
Well, that’s because compute_username returned false, which is translated into a Left signal. This signal, in turn, doesn’t have any output configured as Path() only handles :success outputs per default.
To add this, you need to manually add it.
class Signup < Trailblazer::Activity::Railway
  NewUser = Class.new(Trailblazer::Activity::Signal)

  step :validate
  pass :extract_omniauth
  step :find_user, Output(NewUser, :new) => Path(end_id: "End.new", end_task: End(:new)) do
    step :compute_username, Trailblazer::Activity.Output(Trailblazer::Activity::Left, :failure) => Trailblazer::Activity::DSL::Linear.Track(:failure)
    step :create_user
    step :notify
  end
  pass :log

  # ...
end
We now added a :failure output, leading to a new flow as visible in this diagram.
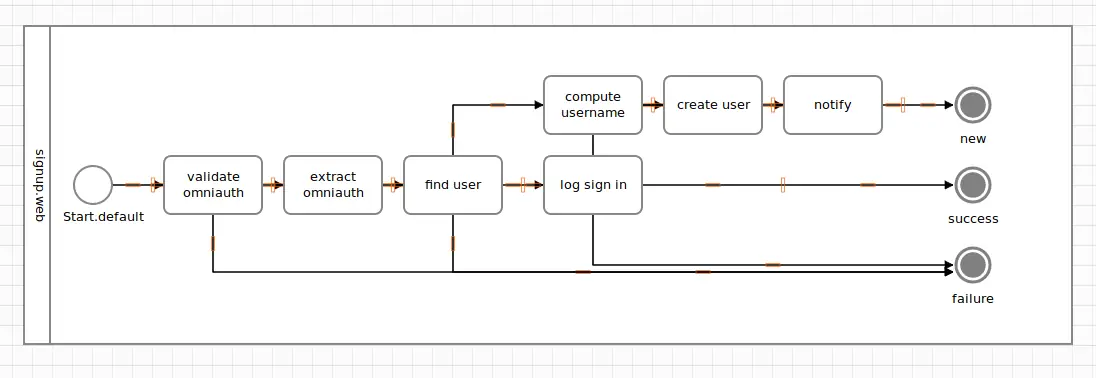
The fragile #compute_username task now got its error-out path leading to the failure terminus.
Terminus Interpretation
Reverting #compute_username to the original version, let’s run the finished and interpret the outcomes real quick.
When running with an empty user database, we should create one!
User.init!()
ctx = {params: data_from_github}

signal, (ctx, _) = Trailblazer::Developer.wtf?(Signup, [ctx])

signal.to_h[:semantic] #=> :new
ctx[:user]             #=> #<User email=\"apotonick@gmail.com\", username=\"apotonick\">
Given that we hit the new terminus and we have a User object in ctx with the data we’re expecting, this must’ve worked. The trace on the console verifies this, too!
Having this user in the system, let’s run another sign-in.
User.init!(User.new("apotonick@gmail.com", 1, "apotonick"))
ctx = {params: data_from_github}

signal, (ctx, _) = Trailblazer::Developer.wtf?(Signup, [ctx])

signal.to_h[:semantic] #=> :success
ctx[:user]             #=> #<User email=\"apotonick@gmail.com\", username=\"apotonick\">
Beautiful! We end up on the success end event, and no additional user is created.
The Signup activity in its divine entireness is completed! You now know all the mechanics of the wiring API and the underlying concept of the circuit, tasks, signals, outputs and connections.
Nesting
Knowing about the wiring mechanics in Trailblazer is one thing. However, the real fun starts with nesting activities. That’s when the ideas of encapsulation, interfaces and reducing dependencies really come into play.
To demonstrate that, we need to complicate out example application a bit.
def validate(ctx, params:, **)
  is_valid = params.is_a?(Hash) && params["info"].is_a?(Hash) && params["info"]["email"]

  is_valid # return value matters!
end
Suppose that the validate task was getting quite complex and bloated. When writing “normal” Ruby, you’d break up one method into several. In Trailblazer, that’s when you introduce a new, smaller activity.
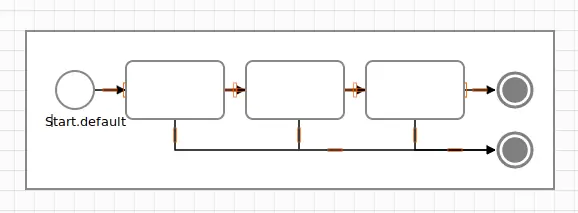
In the sketched activity, we are separating the former #validate method and its chain of &&ed conditions into three steps. Since every step might go wrong, all of them have an “error-out” option.
But, hang on, isn’t that the exact layout of a Railway activity? Absolutely, that’s why implementing this new activity takes five lines of code in Trailblazer.
class Validate < Trailblazer::Activity::Railway
  # Yes, you  can use lambdas as steps, too!
  step ->(ctx, params:, **) { params.is_a?(Hash) }
  step ->(ctx, params:, **) { params["info"].is_a?(Hash) }
  step ->(ctx, params:, **) { params["info"]["email"] }
end
Every condition became a separate step. We didn’t use the usual :method style [but lambdas as a short-cut]. Should one of the conditions fail, the activity will instantly deviate to the error track and skip the rest of the steps. This will be indicated by the last signal being the :failure terminus.
Hey, that’s is an imaginary complication of our example - please don’t do this with every condition you have in your app.
You’re free to test this activity in a separate unit test. We will skip this for now (*cough), and integrate it directly into our original Signup activity.
Subprocess
To use another activity as a “step”, use the Subprocess() macro.
class Signup < Trailblazer::Activity::Railway
  NewUser = Class.new(Trailblazer::Activity::Signal)

  step Subprocess(Validate)
  pass :extract_omniauth
  step :find_user, Output(NewUser, :new) => Path(end_id: "End.new", end_task: End(:new)) do
    step :compute_username
    step :create_user
    step :notify
  end
  pass :log

  # ...
end
When running the sign-up activity, you will realize the behavior is identical to what we had before our over-engineered refactoring.
User.init!()
ctx = {params: data_from_github}

signal, (ctx, _) = Trailblazer::Developer.wtf?(Signup, [ctx])

signal.to_h[:semantic] #=> :new
ctx[:user]             #=> #<User email=\"apotonick@gmail.com\", username=\"apotonick\">
The validation still does its job.
The trace shows the nested activity beautifully intented.
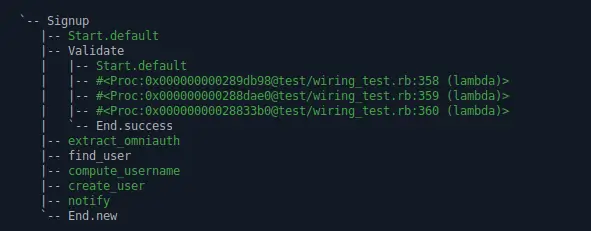
So why the over-complication? What we got now is replicating a chain of && in the former version. This time, however, you will know which condition failed and what went in by using tracing. Look at the trace above - it’s impossible to not understand what was going on.
Additionally, you may add debugging steps, error handler or rewire the conditions dynamically without touching the original snippet.
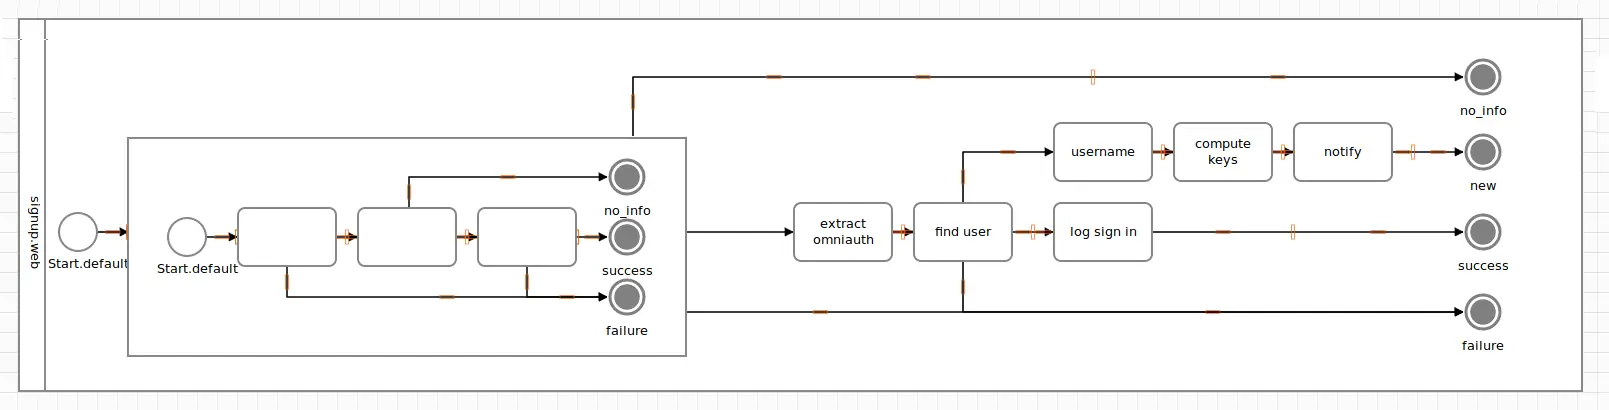
Visualized, our new composed structure would look as follows.
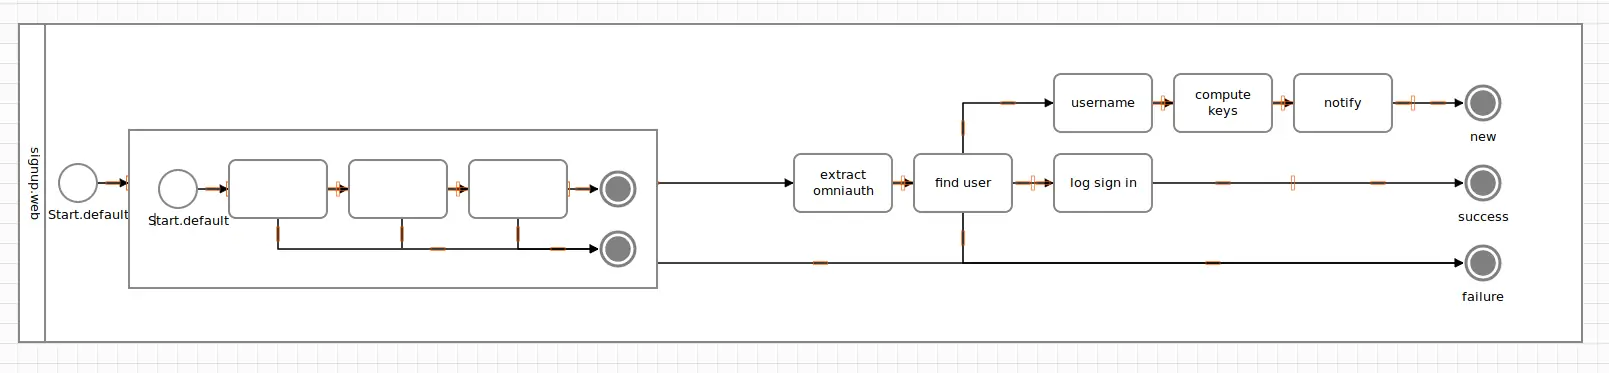
Once the nested Valdiate sub process is hit, it is invoked and executes task by task, eventually reaching a terminus. This is where the outer activity continues.
However, how does the outer Signup activity know what termini the nested Validate activity exposes? And why are they automatically wired to the success and failure track?
This is where all our learnings about semantics, outputs, signals and the DSL come together.
Since a Railway knows about the two outputs failure and success, it automatically connects each task’s outputs. Speaking in Ruby, it’s a bit as if the following wiring is applied to every task added via #step.
step Subprocess(Validate),
  Output(:success) => Track(:success),
  Output(:failure) => Track(:failure)
The beautiful thing here is: you don’t even need to know which signal is emitted by the task (or the nested activity). Since you can reference outputs by their semantic, you as a modeller only connect conceptual termini to ongoing connections! Trailblazer takes care of wiring the underlying output and its signal.
Being able to reference outputs by their semantic is incredibly helpful when using third-party activities (from gems, for instance). You should not know details such as “the :new terminus emits a NewUser signal”. The abstract concept of a terminus named :new is sufficient for modelling.
Now that we’re rolling, let’s go nuts and add another terminus to Validate. When the "info" key is absent in the params structure, it should error-out into a separate end event.

To implement such an activity, we only need to rewire the second step’s failure output to a new terminus.
class Validate < Trailblazer::Activity::Railway
  # Yes, you  can use lambdas as steps, too!
  step ->(ctx, params:, **) { params.is_a?(Hash) }
  step ->(ctx, params:, **) { params["info"].is_a?(Hash) },
    Output(:failure) => End(:no_info)
  step ->(ctx, params:, **) { params["info"]["email"] }
end
When running the nested Validate activity separatedly with a insufficiently filled params hash, we terminate on the :no_info end event.
ctx = {params: {}}

signal, (ctx, _) = Trailblazer::Developer.wtf?(Validate, [ctx])

signal.to_h[:semantic] #=> :no_info
However, when running the Signup activity with an incomplete params hash, it crashes!
ctx = {params: {}}

signal, (ctx, _) = Trailblazer::Developer.wtf?(Signup, [ctx])

#=> Trailblazer::Activity::Circuit::IllegalSignalError: <>[][ #<Trailblazer::Activity::End semantic=:no_info> ]
The last signal of the nested Validate activity happens to be the no_info terminus - and that bad boy is not wired to any connection in the outer Signup activity, yet!
Remember, the Railway strategy only connects success and failure automatically, so we need to connect the third end by ourselves.
class Signup < Trailblazer::Activity::Railway
  NewUser = Class.new(Trailblazer::Activity::Signal)

  step Subprocess(Validate), Output(:no_info) => End(:no_info)
  pass :extract_omniauth
  step :find_user, Output(NewUser, :new) => Path(end_id: "End.new", end_task: End(:new)) do
    step :compute_username
    step :create_user
    step :notify
  end
  pass :log

  # ...
end
It’s as easy as using Output(:no_info) and connecting it using one of the DSL target methods. Here, we use End() to wire the nested activities terminus directly to a new terminus in Signup. Feel free to play around with Track() or Id() to model the flow you desire.
Nesting an activity into another is a bit like calling a library method from another method. However, the explicit modelling has one massive advantage: all possible outcomes of the nested activity are visible and have to be connected in the outer diagram. It’s up to the modeler how those ends are connected, if they lead to separate, new termini, or connect to further business flow.
We covered all important aspects about nesting and are ready for more coding! Once understood that nesting activities is all about connecting their termini to ongoing connections, it becomes a very helpful concept to implement more complex flows and to introduce reusable components.
External tutorials
Step by step refactoring
A series about refactoring a typical Rails spaghetti into Trailblazer architecture: